

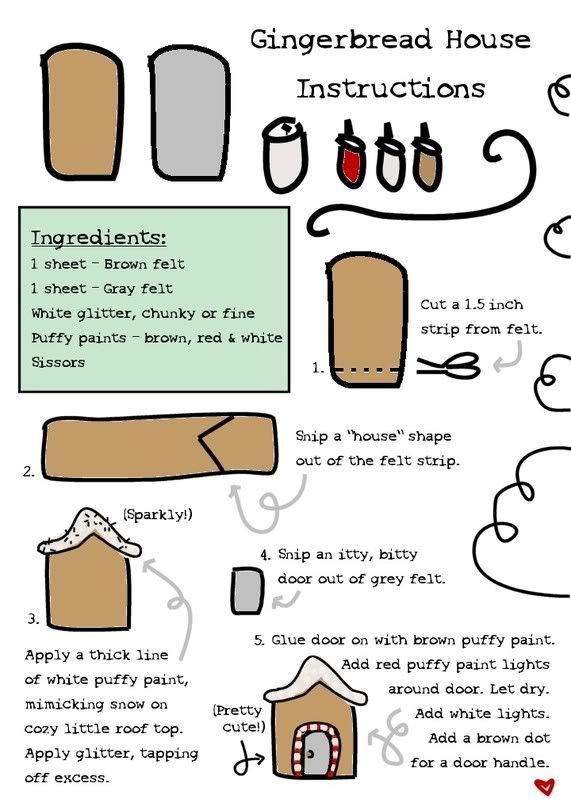
I was planning on making these cute cards to send out at Christmastime, but time escaped me (awesome movie watching and tea drinking won me over). I decided that since I had made 60 of the little felt Gingerbread houses, I should send them out to to at least a few people and spread some cuteness around the world. I sent them out as Thank You cards for all of the wonderful Christmas gifts Dustin and I (and the boys) received.
Here is a quick little tutorial for both the felt gingerbread houses and completed card. :]
 [I drew that ^ by finger. Yes, I said finger... my laptop's touchpad/mouse! Tough stuff.]
 The Card:
 1. I carved this stamp using my Speedball stamp making kit. (I can do a stamp carving tutorial, if anyone is interested!)
 2. Cut white computer paper to the size of your card. Use red ink and stamp your little brick path on the top and bottom of the white sheet. (I was making 15 cards, so this was purely a timesaving tactic.) Let ink dry.
 3. Tear stamped sheet for a snowy effect. Glue in place. I used a glue stick, but I'm sure double stick tape or an adhesive runner would work just as well.
  4. Glue felt Gingerbread house to card, positioning over top of pathway. I used Elmer's clear glue to secure the house to the card, after failing with both double stick tape (DST) and giant glue dots. Don't use too much glue, or it will soak through the felt and leave gross hard marks. :]
5. Next, I used a white ink pad and a cloud stamp that I carved to stamp clouds around the house. The darker the card, the better the cloud showed up, so keep that in mind when picking out your base card.

6. Use a white gel pen (I love my Uniball Singo) to draw around the clouds, exagerating some of the lines.

7. Use a corner rounder to round the two outer corners. Cute, cute, cute!

A herd of drying cards.


1 comment:
so so so cute!
pretty frickin' cool brick path stamp. you rock.
Post a Comment